Recent Posts
importance of mold cleaning by professionals
9/10/2024 (Permalink)
Protect Your Home, Health, and Peace of Mind with SERVPRO of Scioto and Lawrence Counties!
Mold and water damage can wreak havoc on your home and health. Whether it's a leaky pipe, flooding, or unexpected moisture buildup, addressing the damage quickly is critical.
That’s why turning to professionals like SERVPRO of Scioto and Lawrence Counties is the smartest choice! Here’s why:
Expertise & Equipment: Our trained team has the tools and knowledge to properly assess and eliminate mold and water damage at its source. No cutting corners, just thorough, professional restoration.
Health First: Mold can pose serious health risks, especially for those with allergies or respiratory issues. Don’t take chances—trust experts who prioritize your safety.
Fast & Reliable: Time is everything! Water damage left untreated can escalate fast. We respond quickly, minimizing the damage and protecting your home.
Comprehensive Care: From assessing the problem to full restoration, we handle it all. You get peace of mind knowing that your home is in capable hands.
Don’t wait until it’s too late—get professional help you can count on. Contact SERVPRO of Scioto and Lawrence Counties today! #WaterDamageRestoration #MoldRemediation #SERVPRO #SciotoLawrenceCounties #HomeSafety #MoldPrevention
Ensuring Business Resilience Through Proactive Preparedness
1/2/2024 (Permalink)
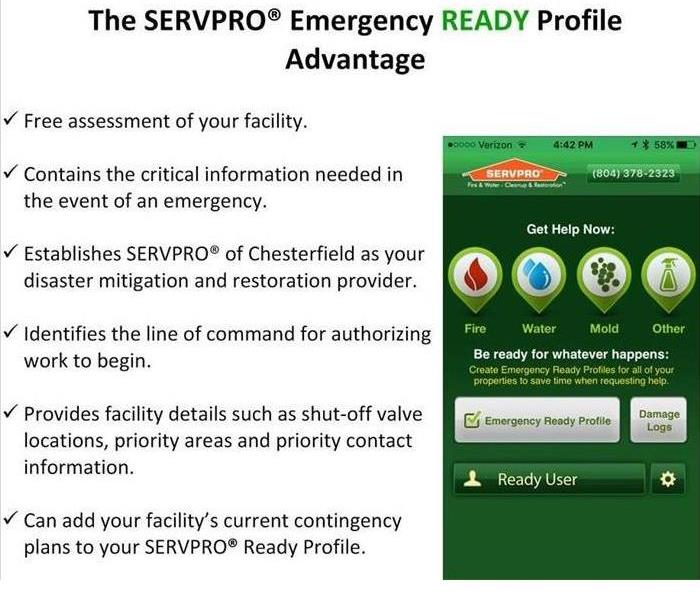
The SERVPRO® Emergency Ready Plan: Ensuring Business Resilience Through Proactive Preparedness
Disasters strike without warning, and businesses that have a solid plan in place are more likely to weather the storm successfully. Recognizing the importance of proactive disaster planning, SERVPRO of Southern Scioto & Lawrence Counties offers a powerful tool – the SERVPRO Emergency Ready Plan (ERP). In this blog, we'll explore the advantages of the ERP and how it can be a game-changer for businesses facing unexpected challenges.
1. No-Cost Assessment:
The standout feature of the SERVPRO Emergency Ready Plan is its no-cost assessment. This means businesses can benefit from emergency preparedness without allocating additional funds, making it an accessible and invaluable resource for businesses of all sizes.
2. Concise Profile Document:
The ERP provides a concise Profile Document containing critical information needed during emergencies. Despite its brevity, this document can save countless hours during a crisis, ensuring essential details are readily available for swift decision-making.
3. Guide for Post-Disaster Reentry:
Time is crucial during disaster recovery. The ERP includes a guide to help businesses reenter their buildings swiftly following an emergency, minimizing downtime and allowing operations to resume quickly.
4. Establishing SERVPRO as Your Provider:
The plan establishes your local SERVPRO as your disaster mitigation and restoration provider. This recognition ensures businesses have a reliable and industry-leading partner nearby to help navigate the challenges of disaster recovery.
5. Identification of the Line of Command:
The ERP identifies the line of command for authorizing work to begin. This clear chain of command saves both time and money, streamlining the process of mitigating damages and initiating necessary restoration work promptly.
6. Facility Details:
Critical facility details, such as shut-off valve locations, priority areas, and contact information, are included in the ERP. This quick reference guide provides clarity on what needs to be done, how to do it, and who to contact, ensuring businesses are truly "Ready for whatever happens."
7. Streamlined Insurance Claims Process:
Navigating the insurance claims process can be complex. The ERP simplifies this process by providing assistance and coordinating necessary paperwork. SERVPRO's expertise in handling insurance claims ensures a quicker and easier experience, allowing businesses to focus on recovery rather than bureaucratic hurdles.
In an unpredictable world, having a well-defined plan for emergencies is not just an option – it's a necessity. The SERVPRO Emergency Ready Plan offers businesses a comprehensive and strategic approach to disaster preparedness. From a no-cost assessment to streamlined insurance claims, the advantages of implementing an ERP are numerous. By choosing SERVPRO of Southern Scioto & Lawrence Counties, businesses can proactively safeguard their operations, giving themselves, their employees, and their customers the peace of mind that comes with being prepared for whatever happens.
'Tis the Season for Fire Safety
12/20/2023 (Permalink)
The holiday season is upon us, and while the festivities bring joy, it's crucial to prioritize safety, especially concerning fire hazards. At SERVPRO of Southern Scioto & Lawrence Counties, we're here to share some essential tips for a fire-safe Christmas.
1. Mind the Decorations: ???? Place flammable items away from heat sources, opting for flame-resistant decorations. Ensure curtains and tinsel are at a safe distance from fireplaces and heaters.
2. Lights with Care: ???? Inspect Christmas lights for damage before use. Choose LED lights to reduce heat emission, and always turn them off when not in use.
3. Fireplace Safety: ???? Maintain a clean fireplace, using a sturdy screen to contain embers. Never leave a fire unattended, and keep flammable items away from its vicinity.
4. Cooking Caution: ????? Avoid leaving cooking unattended, use timers, and keep flammable items away from the stove. Keep a fire extinguisher in the kitchen and know how to use it.
5. Christmas Tree TLC: ???? If you have a live tree, keep it fresh and hydrated to reduce the risk of fire. Position it away from heat sources and turn off lights when not in use.
6. Have an Evacuation Plan: ???? Ensure your family knows the evacuation plan, including the location of fire exits. Practice the plan regularly to familiarize everyone with the procedures.
7. Stay Smoke Alarm Savvy: ???? Regularly test smoke alarms and replace batteries annually. Install alarms in every bedroom and on each floor for early fire detection.
This holiday season let's deck the halls with safety in mind. From all of us at SERVPRO of Southern Scioto & Lawrence Counties, we wish you a safe, joyful, and fire-free Christmas! ???? #SERVPROSafety #HappyHolidays
Safety Tips for a Safer Turkey Frying Experience!
11/17/2023 (Permalink)
The holiday season is upon us, and what better way to celebrate than with a mouthwatering, perfectly fried turkey? While the aroma of a sizzling turkey fills the air, it's crucial to prioritize safety in the kitchen. SERVPRO of Southern Scioto & Lawrence Counties is here to share expert-endorsed tips for a safer and more enjoyable turkey frying experience.
Outdoor Use Only:
- The first rule of thumb is to set up your turkey fryer outdoors, well away from any structures. This minimizes the risk of accidents and ensures a safer cooking environment.
Safe Distance:
- When selecting the cooking spot, ensure a level surface and maintain a safe distance from combustible materials. Safety starts with a secure foundation.
Thaw Completely:
- Before the turkey takes a dip in hot oil, ensure it is fully thawed. This prevents splattering and ensures even cooking throughout.
Dry the Turkey:
- Patience is a virtue, especially when it comes to frying turkeys. Thoroughly pat your turkey dry before it meets the hot oil to avoid any unexpected reactions.
Proper Oil Level:
- Each fryer comes with specific instructions regarding oil levels. Follow these guidelines meticulously to prevent oil overflow and potential hazards.
Temperature Control:
- Invest in a reliable thermometer to monitor the oil temperature. Consistent monitoring prevents overheating, reducing the risk of fires and ensuring a perfectly cooked turkey.
Stay Present:
- The kitchen requires your undivided attention during turkey frying. Never leave the fryer unattended; a watchful eye can prevent accidents and ensure a timely response to any issues.
Fire Extinguisher Nearby:
- Safety is proactive. Keep a grease fire-rated extinguisher within arm's reach. Knowing how to use it is as important as having it on standby.
Appropriate Clothing:
- Dress for safety. Wear protective clothing, including long sleeves and pants, to shield yourself from potential splatters and burns.
Emergency Plan:
- Be prepared for the unexpected. Know the location of emergency exits and keep a first aid kit nearby. Quick and informed action can make all the difference.
Child and Pet Safety:
- Create a designated safe zone, keeping children and pets away from the frying area. This precautionary measure ensures a stress-free cooking experience for everyone.
SERVPRO of Southern Scioto & Lawrence Counties encourages you to prioritize safety while enjoying the festive season.
Happy frying!
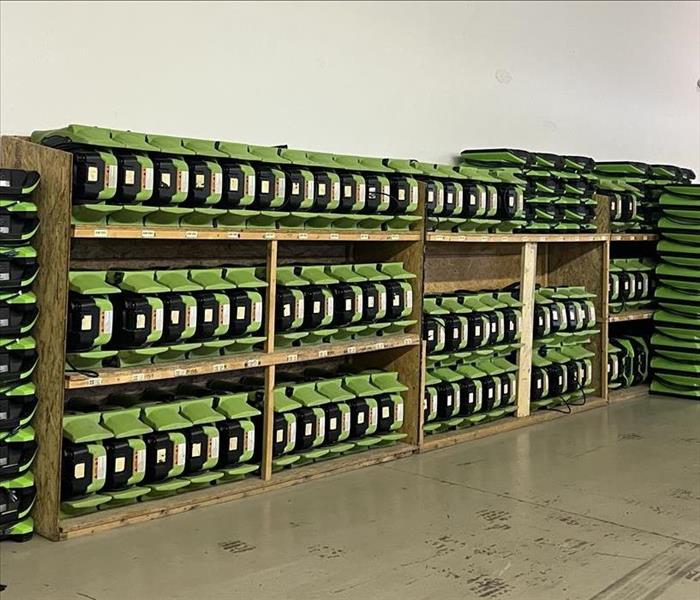
The Power of Air Movers in Restoration
11/6/2023 (Permalink)
The Power of Air Movers in Restoration
When your property faces the devastating effects of water damage, swift and effective action is crucial. SERVPRO, a renowned leader in property restoration and disaster recovery, deploys a remarkable secret weapon to expedite the restoration process: air movers. These unassuming high-velocity fans play a pivotal role in expediting recovery. In this blog, we'll delve into how SERVPRO harnesses the power of air movers to fast-track restoration efforts.
The Role of Air Movers
Air movers are specifically designed to move substantial volumes of air at high velocities. They create a continuous airflow that's instrumental in promoting evaporation, a critical component in drying surfaces quickly and efficiently. Here's why air movers are indispensable:
- Enhanced Air Circulation: In the realm of water damage restoration, increased air circulation is of paramount importance. Air movers are the workhorses that turbocharge the evaporation process by swiftly removing moist air from affected areas.
- Preventing Mold Growth: Rapid drying is a potent weapon against mold and mildew growth, a common post-water damage issue. Air movers act as guardians, fending off these unwanted intruders.
The Role of SERVPRO Professionals
Effectively using air movers requires expertise, and that's where SERVPRO professionals shine:
- Placement and Positioning: SERVPRO experts strategically position air movers for uniform and efficient drying, ensuring that the airflow reaches all affected areas.
- Direction of Airflow: Proper direction of airflow is vital to maximize drying efficiency. SERVPRO technicians ensure that air moves where it's needed most.
- Safety: Prior to deploying air movers, technicians conduct a comprehensive safety check, identifying and mitigating potential hazards. Safety is a top priority.
- Monitoring and Adjustments: Drying progress is under constant scrutiny by SERVPRO professionals. They make necessary adjustments as they monitor the situation, guaranteeing an efficient and thorough drying process.
Comprehensive Restoration Process
Air movers are just one piece of the puzzle in SERVPRO's comprehensive restoration process:
- Water Damage Assessment: The extent of water damage is meticulously assessed. This includes identifying the source, evaluating the affected areas, and categorizing the water type (clean, gray, or black).
- Water Removal: To pave the way for air movers, excess water is efficiently extracted using pumps and extractors.
- Drying and Dehumidification: Air movers, along with dehumidifiers, turbocharge the evaporation process. Excess moisture in the air is removed, further accelerating drying.
- Cleaning and Sanitizing: Following the drying phase, the property undergoes thorough cleaning and sanitization, ensuring a safe and hazard-free environment.
- Restoration: The final phase involves repair work and structural restoration. This phase aims to return the property to its pre-damaged condition.
- Documentation: Throughout the entire restoration journey, SERVPRO professionals maintain detailed records. These records are invaluable for insurance claims and legal matters, providing transparency and accountability.
Air Movers in Specialty Situations
Air movers are versatile tools and are indispensable in various restoration scenarios:
- Flood Restoration: In the aftermath of floods, air movers are instrumental in drying not only structural components but also personal belongings, salvaging precious items and minimizing losses.
- Fire Damage Restoration: Fires often lead to water damage due to firefighting efforts. Air movers play a crucial role in drying the water-damaged areas, expediting the restoration process.
- Mold Remediation: Air movers contribute to mold remediation by expediting the drying of areas affected by water intrusion, which is often the root cause of mold growth.
- Biohazard Cleanup: In biohazard cleanup scenarios, air movers facilitate the drying of areas post-decontamination efforts, ensuring the property is safe and free from hazardous materials.
The Importance of Documentation
Comprehensive documentation of the restoration process, including the utilization of air movers, serves several essential purposes:
- Insurance Claims: Insurance companies typically require detailed records to process property damage claims. These records serve as evidence of the restoration process.
- Legal Matters: In some instances, property damage restoration may lead to legal matters, such as disputes with insurance companies or third parties. Comprehensive documentation can be a valuable asset in such situations.
- Quality Assurance: Documentation also functions as a quality assurance tool. It ensures that the restoration process is thorough, effective, and in compliance with industry standards.
In conclusion, air movers are a cornerstone of SERVPRO of Southern Scioto & Lawrence Counties restoration process. Their role in accelerating drying, preventing mold growth, and enhancing safety is undeniable. When disaster strikes, SERVPRO professionals ensure a swift and effective restoration, minimizing damage, and restoring your property to its pre-damaged condition.
SERVPRO#Likeitneverevenhappened
The Vital Importance of Getting Out and Staying Out in a Fire
10/19/2023 (Permalink)
The Vital Importance of Getting Out and Staying Out in a Fire
In times of a fire emergency, every second counts, and your safety should be the top priority. At SERVPRO of Southern Scioto & Lawrence Counties, we want to underscore the crucial significance of getting out and staying out when faced with a fire.
Your Life Is Irreplaceable: In the face of a fire, remember that your life is irreplaceable. Material possessions can be restored, but your well-being is invaluable. This perspective is the cornerstone of fire safety.
Quick and Decisive Action: When a fire breaks out, there's no time to waste. It's imperative to escape immediately and never re-enter a burning building. The heat, smoke, and toxic gases in a fire can be lethal, making re-entry extremely dangerous. Always prioritize your life and the lives of your loved ones.
Preparedness Is Key: Having a well-practiced fire escape plan is essential. Ensure that both your family and coworkers are familiar with this plan. Practice it regularly to ensure everyone knows what to do in the event of a fire. Preparedness can make a significant difference in your ability to evacuate safely.
SERVPRO's Commitment: In the unfortunate event of a fire, remember that SERVPRO is here to support you. Our dedicated team specializes in fire damage restoration. We're committed to making it "Like it never even happened." While property can be restored, your safety is irreplaceable.
Conclusion: In a fire emergency, remember the mantra: Get out and stay out. Your safety is the most crucial consideration, and every moment matters in a fire. By prioritizing quick and safe evacuation, you can protect yourself and your loved ones. Preparedness and having a well-practiced escape plan are essential components of fire safety. In times of crisis, you can count on SERVPRO to assist with fire damage restoration and help you on the path to recovery. Stay safe, be prepared, and remember the importance of getting out and staying out.
"Community United: SERVPRO and First Responders - A Collaboration that Saves Lives"
10/11/2023 (Permalink)
At SERVPRO of Southern Scioto and Lawrence Counties, community is at the heart of everything we do. We understand that in times of crisis, it takes a collective effort to keep our neighborhoods safe and vibrant. This blog delves into our collaboration with first responders, emphasizing our shared commitment to community well-being. We're also excited to share information about the upcoming First Responders Bowl, proudly sponsored by SERVPRO.
First responders are the unsung heroes of our communities. They are the brave individuals who rush into danger to keep us safe. Whether it's a blazing fire, a medical emergency, or a natural disaster, they are the first on the scene, providing crucial services that save lives and property. Their dedication and sacrifices are nothing short of awe-inspiring.
Our collaboration with first responders is based on the idea that together, we can achieve more. Here's how we work hand in hand:
- Immediate Response: First responders are the first line of defense during emergencies, ensuring safety and providing critical care. SERVPRO professionals stand ready to support their efforts.
- Fire and Water Damage Recovery: After a fire or flood, firefighters extinguish the flames and EMTs provide medical assistance. SERVPRO steps in to clean up and restore affected properties, working diligently to make it "Like it never even happened."
- Training and Preparedness: We conduct joint training sessions and workshops with local first responders to improve emergency response and preparedness. Sharing knowledge and expertise is vital for effective disaster management.
- Resource Sharing: Our collaboration extends to sharing resources during emergencies. This ensures that the right equipment and skilled professionals are available to mitigate the situation.
We're excited to share information about the First Responders Bowl, a college football game that honors the incredible work of first responders. The event, which takes place on December 26, 2023, is proudly sponsored by SERVPRO. It serves as a platform to celebrate the dedication and sacrifices of our first responders, whose heroism is often taken for granted.
In our collaboration with first responders, SERVPRO of Southern Scioto and Lawrence Counties recognizes the importance of community and safety. Together, we form a formidable partnership dedicated to serving and protecting our neighbors in times of crisis. As the First Responders Bowl approaches, we invite you to join us in honoring the courageous individuals who keep our communities safe. We are immensely proud to be part of an effort that recognizes their extraordinary contributions. Together, we make our community stronger and safer.
End-of-Summer Fire Prevention Tips
9/14/2023 (Permalink)
As summer draws to a close, it's the perfect time to reflect on the season's adventures and prepare for the transition to fall. However, it's also crucial to be mindful of fire prevention and safety, especially in areas prone to wildfires or where outdoor fires are common. At SERVPRO of Southern Scioto & Lawrence Counties, we prioritize safety, and we're here to share some important end-of-summer fire prevention tips to help you protect your property and loved ones.
- Know Your Local Regulations: Start by checking for any local or state fire restrictions and regulations. These rules can change throughout the year, so staying informed is vital.
- Clear Vegetation: Living in an area at risk of wildfires means creating a defensible space around your property. Trim or remove dry or dead vegetation, leaves, and branches within at least 30 feet of your home. This minimizes the risk of fire spreading.
- Keep Your Gutters Clean: Don't forget to clear leaves and debris from your gutters and roof. Dry leaves can be highly flammable and pose a fire hazard, especially in hot, dry conditions.
- Dispose of Yard Debris Safely: Instead of burning leaves, branches, or other yard debris during high fire danger periods, consider using community composting or mulching services or take them to a designated disposal site.
- Safely Store Firewood: If you have firewood stacked near your home, make sure it's positioned away from structures and at a safe distance. Proper storage can prevent easy ignition.
- Outdoor Grilling and Cooking: Give your barbecue grill a thorough cleaning as summer ends, removing any grease buildup. Keep a fire extinguisher nearby when grilling, and never leave the grill unattended.
- Extinguish Campfires and Fire Pits: If you've been enjoying campfires or using fire pits this summer, ensure they are fully extinguished with water or sand. Don't forget to stir the ashes to be sure no hot embers remain.
- Dispose of Cigarettes Properly: For those who smoke, never toss cigarette butts on the ground, especially in dry, grassy areas. Utilize designated containers for cigarette disposal.
- Fireworks Safety: If fireworks are permitted in your area, use them responsibly and follow safety guidelines. Avoid lighting fireworks in areas with dry grass or vegetation.
- Stay Informed: Stay updated on local weather and fire conditions. Pay close attention to any fire advisories, evacuation orders, or alerts issued by local authorities.
- Prepare an Emergency Kit: Be prepared for potential wildfires by having an emergency kit ready. It should include essentials like water, non-perishable food, important documents, and first aid supplies.
- Create an Evacuation Plan: Develop a family evacuation plan that includes meeting points and communication methods. Regularly practice the plan with your family to ensure everyone knows what to do in case of an emergency.
At SERVPRO of Southern Scioto & Lawrence Counties, we understand that fire prevention is a year-round responsibility, but it becomes especially crucial as summer fades away and vegetation dries out. By following these precautions and staying informed, you can help reduce the risk of wildfires and protect your home and community. Stay safe and enjoy a smooth transition into the fall season!
Visit: Home Fire Prevention & Safety Tips | American Red Cross for more information.
#SERVPRO #CommercialWaterLoss #RestorationExperts #Likeitneverevenhappened!
Why Choose SERVPRO for Commercial Water Loss?
8/4/2023 (Permalink)
Why Choose SERVPRO® for Commercial Water Loss
When water damage threatens your business, trust SERVPRO of Southern Scioto County & Lawrence Counties to handle the restoration promptly and efficiently. Here are five reasons to choose us:
1. Expertise: With years of experience, our skilled technicians can tackle any size disaster with precision.
2. Quick Response: We guarantee a rapid 24/7 response to minimize potential damage.
3. Minimizing Downtime: Our dedicated team works tirelessly to restore your property swiftly.
4. Tailored Solutions: We provide personalized plans that fit your needs and budget.
5. Comprehensive Services: From water extraction to thorough cleanup, we leave no traces of damage behind.
Contact us at 740-534-9210 for reliable and professional services. Let SERVPRO of Southern Scioto & Lawrence Counties take care of the restoration so you can focus on running your business successfully!
#SERVPRO #CommercialWaterLoss #RestorationExperts
Ensuring Excellence: The Power of Proper Training at SERVPRO
7/20/2023 (Permalink)
At SERVPRO of Southern Scioto County & Lawrence County, we take immense pride in providing top-notch cleaning and restoration services to our valued clients. Behind the success of our operations lies a team of dedicated professionals who undergo rigorous training and certification processes to ensure their expertise and knowledge in various critical areas. In this blog, we shed light on the importance of proper training at SERVPRO and the certifications that our employees pursue to deliver exceptional results.
- IICRC Certifications: Elevating Expertise
The Institute of Inspection, Cleaning, and Restoration Certification (IICRC) is the gold standard in the cleaning and restoration industry. Our employees strive to achieve various IICRC certifications, ranging from water damage restoration to mold remediation and carpet cleaning. These certifications validate their expertise and mastery of specialized techniques, enabling them to handle diverse challenges with confidence and efficiency.
- ASD & WRT: Mastering Water Damage Restoration
Water damage can wreak havoc on properties, making swift and effective restoration a necessity. Our team members undertake training in Applied Structural Drying (ASD) and Water Damage Restoration Technician (WRT) certifications offered by IICRC. These certifications equip them with cutting-edge methods to dry and restore water-damaged structures, safeguarding the integrity of our clients' homes and businesses.
- FSRT: Combatting Fire and Smoke Damage
Fire incidents can leave lasting damage, both visible and unseen. Our professionals excel in Fire and Smoke Restoration Technician (FSRT) certification, which imparts comprehensive knowledge of fire damage assessment and restoration techniques. Armed with this expertise, our team brings back properties to their pre-fire condition with utmost care and precision.
- OSHA Certifications: Safety Above All
At SERVPRO, the safety of our employees, clients, and communities is paramount. To ensure a secure work environment, some of our team members undergo Occupational Safety and Health Administration (OSHA) training and obtain relevant certifications. These certifications empower them to handle potential hazards effectively and adhere to all safety regulations throughout the restoration process.
- Lead-Safe Renovator (LSR) Certification: Tackling Lead-Based Paint Hazards
Pre-1978 properties may contain lead-based paint, posing significant health risks if not handled properly. To address this concern, we have certified Lead-Safe Renovators who have completed an EPA-approved Lead Renovation, Repair, and Painting (RRP) training course. With this expertise, they safely renovate or remodel properties without disturbing lead-based paint, safeguarding the well-being of occupants.
- Lead Abatement Supervisor Certification: Managing Lead Abatement Projects
Supervising lead abatement projects requires specialized knowledge and responsibility. Our Lead Abatement Supervisor certification ensures that we have qualified professionals overseeing the proper removal or encapsulation of lead-based paint. This expertise guarantees that lead hazards are mitigated safely and in compliance with all regulations.
At SERVPRO of Southern Scioto County & Lawrence County, we believe that proper training and certification are the cornerstones of delivering exceptional services to our clients. Our team's dedication to ongoing education and the pursuit of certifications ensures that we stay at the forefront of the industry, equipped with the latest techniques to handle any restoration challenge that comes our way. Rest assured that when you choose SERVPRO, you are choosing a team of experts committed to excellence, safety, and customer satisfaction.


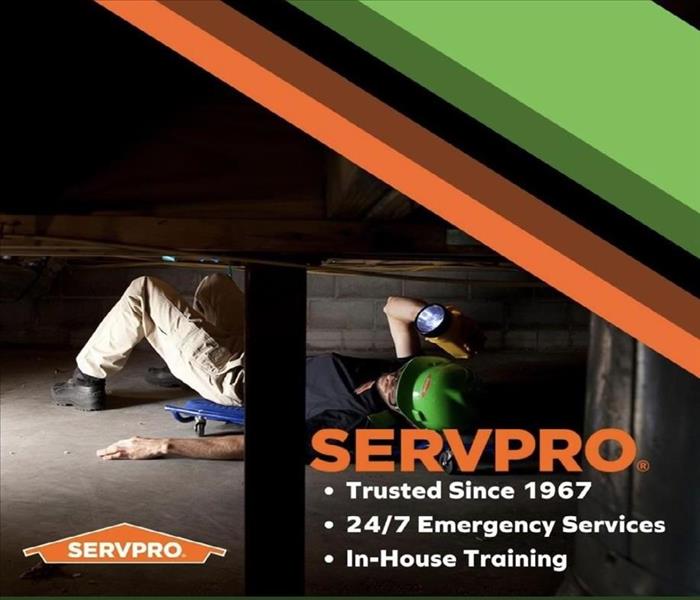
 24/7 Emergency Service